Setting up a Django development environment
Now that you know what Django is for, we'll show you how to set up and test a Django development environment on Windows, Linux (Ubuntu), and macOS — whatever common operating system you are using, this article should give you what you need to be able to start developing Django apps.
| Prerequisites: | Basic knowledge of using a terminal/command line and how to install software packages on your development computer's operating system. |
|---|---|
| Objective: | To have a development environment for Django (6.1.*) running on your computer. |
Django development environment overview
Django makes it very easy to set up your own computer so that you can start developing web applications. This section explains what you get with the development environment, and provides an overview of some of your setup and configuration options. The remainder of the article explains the recommended method of installing the Django development environment on Ubuntu, macOS, and Windows, and how you can test it.
What is the Django development environment?
The development environment is an installation of Django on your local computer that you can use for developing and testing Django apps prior to deploying them to a production environment.
The main tools that Django itself provides are a set of Python scripts for creating and working with Django projects, along with a simple development web server that you can use to test local (i.e., on your computer, not on an external web server) Django web applications on your computer's web browser.
There are other peripheral tools, that often form part of the development environment, that we won't be covering here. These include things like a text editor or IDE for editing code, linters for auto formatting, and so on. We are assuming that you've already got a text editor installed.
What are the Django setup options?
Django is extremely flexible in terms of how and where it can be installed and configured. Django can be:
- Installed on different operating systems.
- Installed from source, from the Python Package Index (PyPi) and in many cases from the host computer's package manager application.
- Configured to use one of several databases, which may also need to be separately installed and configured.
- Run in the main system Python environment or within separate Python virtual environments.
Each of these options requires a slightly different configuration and setup. The following subsections explain some of your choices. For the rest of the article, we'll show you how to set up Django on a small number of operating systems, and that setup will be assumed throughout the rest of this module.
Note: Other possible installation options are covered in the official Django documentation. We link to the appropriate documents below.
What operating systems are supported?
Django web applications can be run on almost any machine that can run the Python 3 programming language: Windows, macOS, Linux/Unix, Solaris, to name just a few. Almost any computer should have the necessary performance to run Django during development.
In this article, we'll provide instructions for Windows, macOS, and Linux/Unix.
What version of Python should be used?
You can use any Python version supported by your target Django release. For Django 6.1 the allowed versions are Python 3.12 to 3.14 (see FAQ:Installation).
The Django project recommends (and "officially supports") using the newest available version of the supported Python release.
Where can we download Django?
There are three places to download Django:
- The Python Package Repository (PyPi), using the pip tool. This is the best way to get the latest stable version of Django.
- Use a version from your computer's package manager. Distributions of Django that are bundled with operating systems offer a familiar installation mechanism. Note however that the packaged version may be quite old, and can only be installed into the system Python environment (which may not be what you want).
- Install from source. You can get and install the latest bleeding-edge version of Django from the source. This is not recommended for beginners but is needed when you're ready to start contributing back to Django itself.
This article shows how to install Django from PyPi, in order to get the latest stable version.
Which database?
Django officially supports the PostgreSQL, MariaDB, MySQL, Oracle, and SQLite databases, and there are community libraries that provide varying levels of support for other popular SQL and NoSQL databases. We recommend that you select the same database for both production and development (although Django abstracts many of the database differences using its Object-Relational Mapper (ORM), there are still potential issues that are better to avoid).
For this article (and most of this module) we will be using the SQLite database, which stores its data in a file. SQLite is intended for use as a lightweight database and can't support a high level of concurrency. It is, however, an excellent choice for applications that are primarily read-only.
Note: Django is configured to use SQLite by default when you start your website project using the standard tools (django-admin). It's a great choice when you're getting started because it requires no additional configuration or setup.
Installing system-wide or in a Python virtual environment?
When you install Python3 you get a single global environment that is shared by all Python3 code. While you can install whatever Python packages you like in the environment, you can only install one particular version of each package at a time.
Note: Python applications installed into the global environment can potentially conflict with each other (i.e., if they depend on different versions of the same package).
If you install Django into the default/global environment then you will only be able to target one version of Django on the computer. This can be a problem if you want to create new websites (using the latest version of Django) while still maintaining websites that rely on older versions.
As a result, experienced Python/Django developers typically run Python apps within independent Python virtual environments. This enables multiple different Django environments on a single computer. The Django developer team itself recommends that you use Python virtual environments!
This module assumes that you've installed Django into a virtual environment, and we'll show you how below.
Installing Python 3
In order to use Django you must have Python 3 on your operating system. You will also need the Python Package Index tool — pip3 — which is used to manage (install, update, and remove) Python packages/libraries used by Django and your other Python apps.
This section briefly explains how you can check what versions of Python are present, and install new versions as needed, for Ubuntu Linux 26.04 (and 24.04), macOS, and Windows 11.
Note: Depending on your platform, you may also be able to install Python/pip from the operating system's own package manager or via other mechanisms. For most platforms, you can download the required installation files from https://www.python.org/downloads/ and install them using the appropriate platform-specific method.
Ubuntu 26.04
Ubuntu Linux 26.04 LTS includes Python 3.14 by default. You can confirm this by running the following command in the bash terminal:
python3 -V
# Output: Python 3.14.4
However, neither the Python Package Index tool (pip3) nor the venv module (which you'll use later to create virtual environments) are available by default. You can install both in the bash terminal using:
sudo apt install python3-pip python3-venv
Note:
If you're using Ubuntu 24.04 LTS instead, python3 -V will report Python 3.12, which is still within the range supported by Django 6.1, so you don't need to install a newer Python version to follow along.
You'll still need to run sudo apt install python3-pip python3-venv — pip and venv aren't installed by default on 24.04 either.
macOS
macOS does not include Python 3 by default (Python 2 is included on older versions). You can confirm this by running the following command in the terminal:
python3 -V
This will either display the Python version number, which indicates that Python 3 is installed, or python3: command not found, which indicates Python 3 was not found.
You can easily install Python 3 (along with the pip3 tool) from python.org:
-
Download the required installer:
- Go to https://www.python.org/downloads/macos/
- Download the stable release of the most recent supported version that works with Django 6.1. (at time of writing this is Python 3.14.7).
-
Locate the file using Finder, and double-click the package file. Following the installation prompts.
You can now confirm successful installation by running python3 -V again and checking for the Python version number.
You can similarly check that pip3 is installed by listing the available packages:
pip3 list
Windows 11
Windows doesn't include Python by default, but you can easily install it (along with the pip3 tool) from python.org:
-
Download the required installer:
- Go to https://www.python.org/downloads/windows/
- Download the stable release of the most recent supported version that works with Django 6.1. (at time of writing this is Python 3.14.7).
-
Install Python by double-clicking on the downloaded file and following the installation prompts
-
Be sure to check the box labeled "Add Python to PATH"
You can then verify that Python 3 was installed by entering the following text into the command prompt:
py -3 -V
The Windows installer incorporates pip3 (the Python package manager) by default. You can list installed packages as shown:
py -3 -m pip list
Note: The installer should set up everything you need for the above command to work. If however you get a message that Python cannot be found, you may have forgotten to add it to your system path. You can do this by running the installer again, selecting "Modify", and checking the box labeled "Add Python to environment variables" on the second page.
Calling Python 3 and pip3
You will note that in the previous sections we use different commands to call Python 3 and pip on different operating systems.
If you only have Python 3 installed (and not Python 2), the bare commands python and pip can generally be used to run Python and pip on any operating system.
If this is allowed on your system you will get a version "3" string when you run -V with the bare commands, as shown:
python -V
pip -V
If Python 2 is installed then to use version 3 you should prefix commands with python3 and pip3 on Linux/macOS, and py -3 and py -3 -m pip on Windows:
# Linux/macOS
python3 -V
pip3 -V

# Windows
py -3 -V
py -3 -m pip list
The instructions below show the platform specific commands as they work on more systems.
Using Django inside a Python virtual environment
We'll create our virtual environments using venv, the virtual environment tool built into Python itself (Python has included venv since version 3.3, so there's nothing extra to install beyond what you set up above). This is also what the Django project itself recommends.
Note:
On Ubuntu you must have already installed the python3-venv package for this to work (see the Ubuntu Python installation instructions above). On macOS and Windows, venv is included automatically when you install Python from python.org, so there's no separate setup step for those platforms.
Creating a virtual environment
Navigate to the folder where you want to keep your Django projects, then create a new virtual environment using the venv module. The command below creates a folder named my_django_environment containing a self-contained copy of Python and its tools:
# Linux/macOS
python3 -m venv my_django_environment

# Windows
py -3 -m venv my_django_environment
The environment isn't active yet — you have to activate it explicitly, and you'll need to do this again in any new terminal session:
# Linux/macOS
source my_django_environment/bin/activate

# Windows (Command Prompt)
my_django_environment\Scripts\activate.bat

# Windows (PowerShell)
my_django_environment\Scripts\Activate.ps1
Once the environment is active, the start of your prompt will show the name of the environment in parentheses, as shown below (this example is from Ubuntu, but the effect is the same on Windows/macOS):
(my_django_environment) ubuntu@ubuntu:~$
Now you're inside the virtual environment you can install Django and start developing.
Note: From now on in this article (and indeed the module) please assume that any commands are run within a Python virtual environment like the one we set up above.
Note:
If PowerShell refuses to run Activate.ps1 with a message about running scripts being disabled, you'll need to allow script execution for the current session first:
Set-ExecutionPolicy -Scope Process -ExecutionPolicy Bypass
Using a virtual environment
There are just a few other things you should know about working with virtual environments:
deactivate— Exit out of the current Python virtual environment.- To use the environment again in a new terminal session, re-run the activate command shown above (e.g.,
source my_django_environment/bin/activate) — there's no separate "list environments" or "switch environment" command, since each environment is just a folder. - To remove an environment entirely, first
deactivateit, then delete its folder (e.g.,rm -rf my_django_environmenton Linux/macOS, or delete the folder in File Explorer on Windows).
Installing Django
Once you've created a virtual environment and activated it, you can use pip3 to install Django.
# Linux/macOS
python3 -m pip install django~=6.1

# Windows
py -3 -m pip install django~=6.1
You can test that Django is installed by running the following command (this just tests that Python can find the Django module):
# Linux/macOS
python3 -m django --version

# Windows
py -3 -m django --version
Note: If the above Windows command does not show a django module present, try:
py -m django --version
In Windows Python 3 scripts are launched by prefixing the command with py -3, although this can vary depending on your specific installation.
Try omitting the -3 modifier if you encounter any problems with commands.
In Linux/macOS, the command is python3.
Warning:
The rest of this module uses the Linux command for invoking Python 3 (python3). If you're working on Windows replace this prefix with: py -3
Source code management with Git and GitHub
Source Code Management (SCM) and versioning tools allow you to reliably store and recover versions of your source code, try out changes, and share code between your experiments and "known good code" when you need to.
There are many different SCM tools, including git, Mercurial, Perforce, SVN (Subversion), CVS (Concurrent Versions System), etc., and cloud SCM hosting sources such as Bitbucket, GitHub, and GitLab. For this tutorial we'll hosting our code on GitHub, one of the most popular cloud based source code hosting services, and using the git tool to manage our source code locally and send it to GitHub when needed.
Note: Using SCM tools is good software development practice! These instructions provide a basic introduction to git and GitHub. To learn more, see Learning Git.
Key concepts
Git (and GitHub) use repositories ("repos") as the top level "bucket" for storing code, where each repo normally contains the source code for just one application or module. Repositories can be public, in which case the code is visible to everyone on the internet, or private, in which case they are restricted to the owning organization or user account.
All work is done on a particular "branch" of code in your repo. When you want to back up some changes to a branch you can create a "commit", which stores all changes since your last commit to the current branch.
The repo is created with a default branch named "main". You can spawn other branches off this using git, which initially have all the commits of the original branch. You can evolve branches separately by adding commits, and then later on use a "Pull Request" (PR) on GitHub to merge changes from one branch to another. You can also use git to switch between branches on your local computer, for example to try out different things.
In addition to branches, it is possible to create tags on any branch and later recover that branch at that point.
Create an account and repository on GitHub
First we will create an account on GitHub (this is free). Then we create and configure a repository named "django_local_library" for storing the Local library website as we evolve it in the rest of this tutorial.
The steps are:
-
Visit https://github.com/ and create an account.
-
Once you are logged in, click the + link in the top toolbar and select New repository.
-
Fill in all the fields on this form. While these are not compulsory, they are strongly recommended.
-
Enter a repository name: "django_local_library".
-
Enter a new repository description: "Local Library website written in Django".
-
Select "Public" for the repository (the default).
Warning: This will make all source code visible. Remember not to store credentials or other sensitive material in your repo unless it is private.
-
Choose Python in the Add .gitignore selection list.
-
Choose your preferred license in the Add license selection list. MDN uses "Creative Commons Zero v1.0 Universal" for this example.
-
Check Initialize this repository with a README.
-
-
Press Create repository.
The repository will be created, containing just the files
README.txtand.gitignore.
Clone the repo to your local computer
Now that the repository ("repo") is created on GitHub we are going to want to clone (copy) it to our local computer:
-
On GitHub, click the green Code button. In the "Clone" section, select the "HTTPS" tab, and copy the URL. If you used the repository name "django_local_library", the URL should be something like:
https://github.com/<your_git_user_id>/django_local_library.git. -
Install git for your local computer (official Git download guide).
-
Open a command prompt/terminal and clone your repo using the URL you copied above:
bashgit clone https://github.com/<your_git_user_id>/django_local_library.gitThis will create the repository inside the current directory.
-
Navigate into the repo folder.
bashcd django_local_library
Modify and sync changes
Now we're going to modify the .gitignore file on the local computer, commit the change, and update the repository on GitHub.
This is a useful change to make, but mostly we're doing it to show you how to pull changes from GitHub, make changes locally, and then push them to GitHub.
-
In the command prompt/terminal we first "fetch" (get) and then pull (get and merge into the current branch) the latest version of the source from GitHub:
Note: This step isn't strictly necessary as we have just cloned the source and know it is up to date. However in general you should update your sources from GitHub before making changes.
bashgit fetch origin main git pull origin mainThe "origin" is a remote, which represents the location of the repo where the source is located, and "main" is the branch. You can verify that origin is our repo on GitHub using the command:
git remote -v. -
Next we checkout a new branch to store our changes:
bashgit checkout -b update_gitignoreThe
checkoutcommand is used to switch some branch to be the current branch that you are working on. The-bflag indicates that we intend to create a new branch named "update_gitignore" instead of selecting an existing branch with that name. -
Open the .gitignore file, copy the following lines into the bottom of it, and then save:
# Text backup files
*.bak

# Database
*.sqlite3
Note that
.gitignoreis used to indicate files that should not be backed up by git automatically, such as temporary files and other build artifacts. -
Use the
addcommand to add all changed files (that aren't ignored by the .gitignore file) to the "staging area" for the current branch.bashgit add -A -
Use the
statuscommand to check that all files you are about tocommitare correct (you want to include source files, not binaries, temporary files etc.). It should look a bit like the listing below.bashgit statusOn branch update_gitignore Changes to be committed: (use "git restore --staged <file>..." to unstage) modified: .gitignore -
When you're satisfied,
committhe files to your local repo, using the-mflag to specify a concise but clear commit message. This is equivalent to signing off on the changes and making them an official part of the local repo.bashgit commit -m ".gitignore: add .bak and .sqlite3" -
At this point, the remote repo has not been changed. We can push the
update_gitignorebranch to the "origin" repo (GitHub) using the following command:bashgit push origin update_gitignore -
Go back to the page on GitHub where you created your repo and refresh the page.
A banner should appear with a button to press if you want to "Compare and pull request" the branch you just uploaded. Select the button and then follow the instructions to create and then merge a pull request.
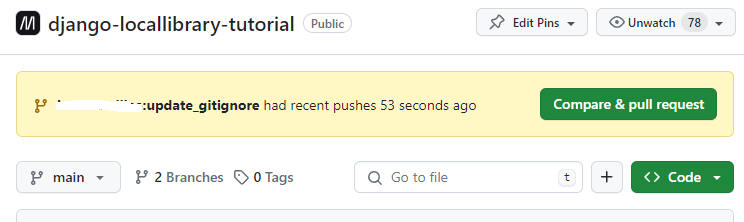
After merging, the "main" branch on the repo on GitHub will contain your changes to
.gitignore. -
You can continue to update your local repo as files change using this add/commit/push cycle.
In the next topic we'll use this repo to store our local library website source code.
Other Python tools
Experienced Python developers may install additional tools, such as linters (which help detect common errors in code).
Note that you should use a Django-aware linter such as pylint-django, because some common Python linters (such as pylint) incorrectly report errors in the standard files generated for Django.
Testing your installation
The above test works, but it isn't very much fun. A more interesting test is to create a skeleton project and see it working. To do this, first navigate in your command prompt/terminal to where you want to store your Django apps. Create a folder for your test site and navigate into it.
mkdir django_test
cd django_test
You can then create a new skeleton site called "mytestsite" using the django-admin tool as shown. After creating the site you can navigate into the folder where you will find the main script for managing projects, called manage.py.
django-admin startproject mytestsite
cd mytestsite
We can run the development web server from within this folder using manage.py and the runserver command, as shown.
# Linux/macOS
python3 manage.py runserver

# Windows
py -3 manage.py runserver
Note: You can ignore the warnings about "unapplied migration(s)" at this point!
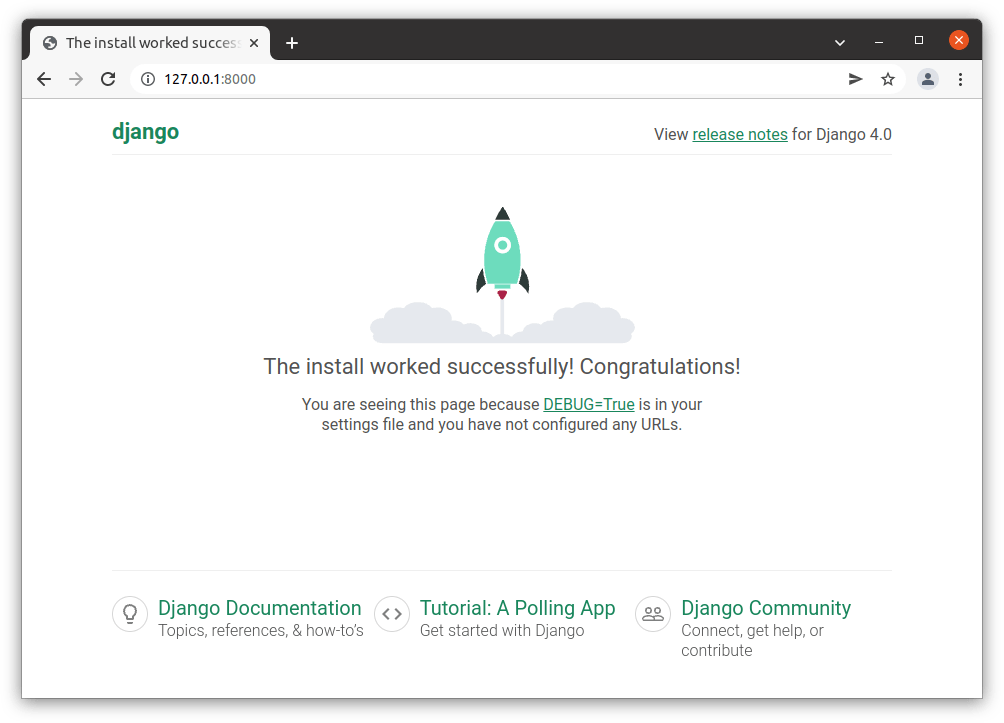
Once the server is running you can view the site by navigating to the following URL on your local web browser: http://127.0.0.1:8000/. You should see a site that looks like this:
Summary
You now have a Django development environment up and running on your computer.
In the testing section you also briefly saw how we can create a new Django website using django-admin startproject, and run it in your browser using the development web server (python3 manage.py runserver). In the next article, we expand on this process, building a simple but complete web application.
See also
- Quick Install Guide (Django docs)
- How to install Django — Complete guide (Django docs) — also covers how to remove Django
- How to install Django on Windows (Django docs)